Revamp Your Music with Convolution Reverb – Here’s How!
In today’s world of digital audio, convolution reverb has emerged as a powerful tool for creating stunningly realistic room acoustics in your productions.
Using the magic of sound design and cutting-edge technology, this unique method allows you to recreate the natural reverberations from actual physical spaces within your studio setup.
If you’ve ever wondered how to harness the power of this game-changing effect and elevate your mix to new heights, look no further!
This blog post will give you an in-depth understanding of convolution reverb while providing tips and best practices that can help refine your work.
So dive in, explore its vast potential, and watch as we unravel the mysteries behind this extraordinary effects processor!
Key Takeaways:
- Convolution reverb uses algorithms and impulse responses to replicate natural reverberation, creating immersive sound experiences.
- Frequency-specific reverberation accurately simulates how frequencies behave in real spaces, using impulse responses for detailed spatial effects.
- To optimize convolution reverb, select suitable impulse responses, fine-tune placement, and balance with other effects in the mix.
Table of Contents
Understanding Convolution Reverb
Convolution reverb is a powerful audio effect plugin that can recreate realistic acoustic spaces and environments, adding depth, richness, and ambiance to digital music productions.
Definition And Explanation
Convolution reverb is a digital audio effect that uses mathematical algorithms to recreate the reverberation of physical space.
It combines an input signal, such as a recorded sound or piece of music, with an impulse response – a recording in the space where reverberation is desired. The resulting output mimics that specific environment’s natural acoustics and reflections, adding depth and dimension to your audio.
For example, imagine you’re working on a musical project and want to replicate the acoustic properties of a majestic cathedral.
With convolution reverb, you can apply an impulse response recorded within that cathedral to your track without physically recording your music.
This powerful technique enables sound designers and audio engineers to simulate distinct environments within their mixes, creating immersive sonic experiences for listeners across various media formats such as film scores or video game soundtracks.
Brief History And How It Sounds
Convolution reverb has its roots in digital signal processing and was first introduced in the 1970s. It became a powerful tool for sound engineers and musicians to mimic natural acoustics without recording in an actual physical space.
Convolution reverb captures the essence of a room, arena, or cathedral using spectral analysis, providing users with highly detailed reverberation effects.
In terms of how it sounds, convolution reverb is known for producing a more realistic-sounding effect when compared to other types of reverb, such as algorithmic reverb.
It uses high-quality recordings from actual physical spaces instead of synthesizing effects through programming.
The resulting sound can create anything from subtle echoes to vividly complex acoustic environments that make your music feel like it’s being performed in a live venue or concert hall.
Some famous examples include Ableton Live’s Convolution Reverb Pro plugin and Valhalla Room plugin, which professionals across various industries use in music production, film scoring, podcasting, and more frequently.
Overall, convolution reverb offers incredible versatility for sound designers looking for that perfect mixing element. Its ability to accurately manipulate “frequency-specific reverbs” makes it easy for engineers to recreate specific environments even when recording remotely, making it an ideal choice in many different settings!
Advantages And Benefits
Convolution reverb has numerous advantages and benefits, making it a popular choice among sound designers, audio engineers, and recording artists.
Firstly, convolution reverb creates a realistic acoustic space with proper localization and a sense of depth. It can accurately create the ambiance of various spaces such as studios, arenas, cathedrals, or even outdoor environments.
Secondly, convolution reverb provides more precise control over frequency-specific reverberation than algorithmic reverb. Using impulse responses captured from real physical spaces results in more realistic-sounding reverbs that match the source material’s frequency response and spectral characteristics.
Lastly, most convolution reverb plugins have advanced features like early reflection modeling, adding another realism layer to your recordings. This feature emulates how sound bounces off surfaces in a room before reaching our ears.
How Does Convolution Reverb Work?
Convolution reverb uses impulse responses to capture the acoustic properties of physical spaces, which are then used to generate realistic frequency-specific reverberation.
Using Impulse Responses
Convolution reverb uses impulse responses to recreate the sound of physical space.
Impulse responses are recordings of a space’s acoustic characteristics, including its frequency and timing response.
For example, an impulse response would capture the echoes and reverberations when sounds bounce off the stone walls if you were in a cathedral.
To use convolution reverb with an impulse response, select the appropriate file for your desired effect. It takes this recording and convolves it with your audio track to create a realistic simulation of that room’s acoustics. This allows you to add natural-sounding reverberation without access to expensive recording studios or concert halls.
One benefit of impulse responses is that they allow for precise control over different frequency decay times within the sound field.
In post-production, you can also layer multiple impulses with different time signatures to create more complex environments like large arenas or busy streetscapes.
Overall, this technique offers distinct advantages over algorithmic reverb methods by using real-life examples rather than mathematical approximations to create high-quality spatial effects in music production and sound design projects.
Frequency Specific Reverberation
One of the defining features of convolution reverb is its ability to create frequency-specific reverberation. This means that different frequencies within a sound are affected differently by the reverb, just as they would be in a real acoustic space.
For example, high frequencies tend to decay more quickly than low frequencies in many spaces, and convolution reverb can accurately recreate this effect. This creates a more natural and realistic-sounding experience for listeners.
This level of detail is achieved through impulse responses, which capture the overall tone and the spatial characteristics of a room or other environment.
The resulting frequency response graph for each impulse response provides crucial information about how different frequencies will behave in that space.
Combining these graphs with original audio signals allows convolution reverb plugins to create particular simulated environments that sound incredibly true to life.
Some common examples of frequency-specific reverberation include recording vocals in an intimate studio setting versus performing on stage in an arena or cathedral.
Each space has unique spectral characteristics that affect how listeners perceive sounds; convolution reverb allows sound designers and engineers to digitally replicate those same effects to enhance recordings and performances.
Creating Realistic Acoustic Spaces
Convolution reverb is a potent tool for creating realistic acoustic spaces. By using high-quality recordings of actual physical spaces, convolution allows engineers and producers to recreate a specific environment’s unique sound remotely. For example, convolution reverb can make that happen if you’re working on a track that you want to sound like it was recorded in a cathedral or arena instead of a studio.
Selecting the correct impulse response is the key to creating realistic acoustic spaces with convolution reverb. The impulse response determines what kind of space the reverb will emulate – a small room with little echo or a large concert hall with long tail reverberations.
Selecting an impulse response that matches your desired effect can produce stunningly accurate recreations of real-world sonic environments.
Creating realistic acoustic spaces using convolution reverb involves choosing the right impulse responses and correctly placing and fine-tuning them within your mix. With practice and attention to detail, this technique can significantly enhance the quality and authenticity of any production’s overall sound design.
Types Of Convolution Reverb
There are two main types of convolution reverb: hardware-based and software-based, each with unique features and advantages.
Hardware-based
Hardware-based convolution reverb involves dedicated hardware units designed specifically for creating high-quality reverberation effects. These units offer a more robust and reliable performance than software-based solutions, as they are typically built to handle complex processing tasks with minimal latency.
Sony DRE-S777 is a hardware based convolution reverb.
While hardware-based solutions can be more expensive than software alternatives, they often provide better sound quality and flexible results. They also tend to come equipped with features such as EQ controls or multiple stereo outputs, making them a versatile tool for professional audio engineers looking to add depth and dimensionality to their recordings.
Software-based
Convolution reverb can either be hardware-based or software-based. Software-based convolution reverb plugins offer the flexibility of being used in a digital audio workstation (DAW), allowing for ease of use and quick parameter adjustments. These plugins provide high-quality sound processing, allowing producers and engineers to create realistic acoustic spaces within their recordings.
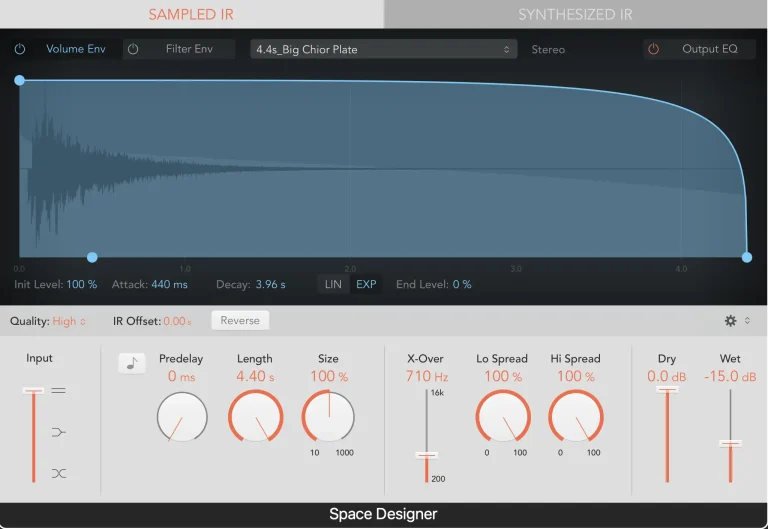
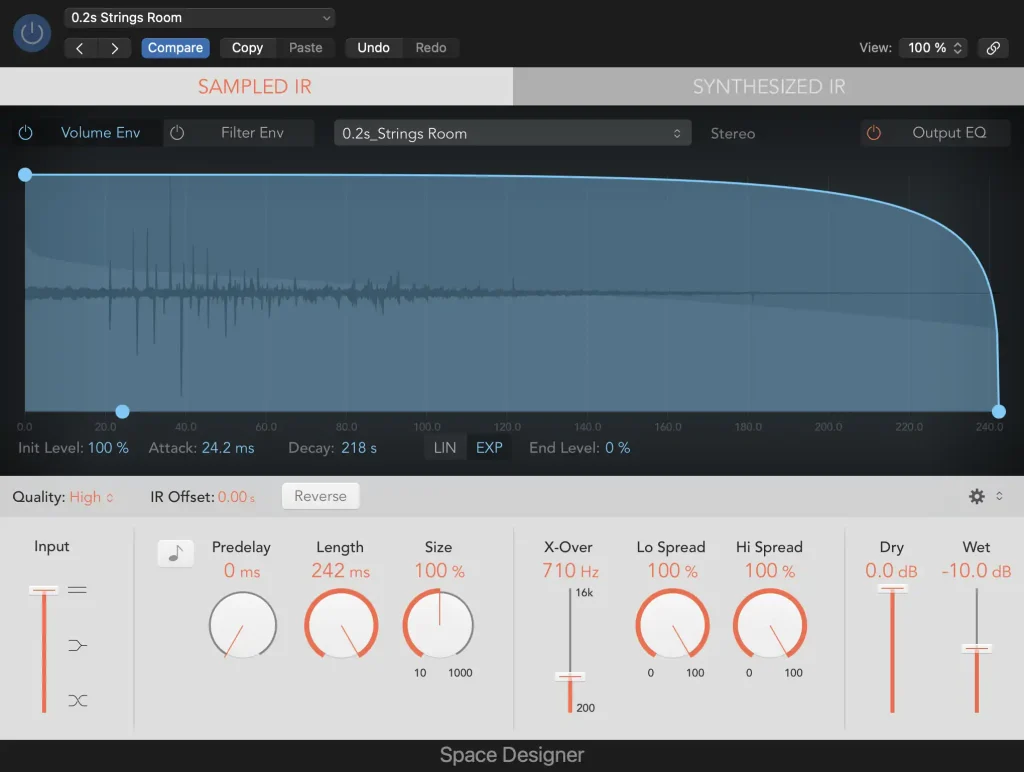
Some popular software-based convolution reverb plugins include Altiverb, Waves IR1, and Logic Pro’s Space Designer. These plugins offer a variety of impulse responses, from large concert halls to small studios, providing users with multiple options to choose from when creating their desired ambiance.
One advantage of using software-based convolution reverb is the ability to use it on different tracks within the same project. For example, one could apply different room reverbs on each instrument or vocal track separately, giving them individual sonic characteristics that complement each other in the mixdown process.
Whether you’re looking for a premium option or a free plugin to get started with convolution reverb, these top contenders will help you achieve the perfect room reverb effect for any recording or production project.
Tips And Best Practices For Using Convolution Reverb
– To achieve the best results with convolution reverb, it is essential to choose the right impulse response for your project carefully, proper placement and fine-tune for each sound source or instrument, and balance it well with other effects in your mix.
Choosing The Right Impulse Response
Choosing the right impulse response is crucial to achieving a believable and natural-sounding convolution reverb effect.
An impulse response is essentially a recording of how sound reacts in a particular space, such as a room or concert hall.
When selecting an impulse response, it’s important to consider factors like the size and shape of the space, the nature of the surfaces within that space, and even things like temperature, humidity, and barometric pressure.
For example, suppose you’re trying to create a chamber reverb effect for classical music recordings. In that case, you’ll want an impulse response that accurately captures the rich acoustics of that specific type of acoustic environment.
On the other hand, if you’re producing electronic dance music with lots of heavy bass and percussion elements, you may prefer an impulse response that creates more defined reflections without too much low-end build-up.
Ultimately, experimenting with different impulse responses is key to finding what works best for your specific project – browsing online libraries or capturing your own IRs from unique spaces.
With so many free and premium plugins available, there’s no shortage of experimentation opportunities!
Proper Placement And Fine-tuning with Convolution Reverb
Achieving the best results with convolution reverb requires proper placement and fine-tuning.
The table below outlines seven key tips for obtaining optimal results:
|
Tip # | Description |
|---|---|
|
1 |
Choose the right impulse response (IR) to find the best fit for your track. |
|
2 |
Experiment with placing the convolution reverb plugin before or after EQ or compression in the signal chain. |
|
3 |
Fine-tune the balance between dry and wet signals for a natural-sounding reverb effect. |
|
4 |
Tailor the decay time to avoid muddying the track or making it sound unnatural. |
|
5 | Use high-pass filtering on reverb sends to reduce unwanted low-frequency build-up. |
|
6 |
Adjust the stereo width settings to control the width of the reverb in the mix. |
|
7 |
Ensure that elements in the mix sit well within their space for a cohesive, coherent sound. |
Following these tips for proper placement and fine-tuning, you can create realistic and practical convolution reverb effects in your music production and sound design projects.
Balancing With Other Effects
Balancing convolution reverb with other effects is essential to create a seamless and cohesive final mix when using convolution reverb in your audio production.
One common mistake is overusing reverb, which can cause the sound to become muddy or indistinct. It’s important always to consider the context of your project when adding effects like EQ, compression, delay, and modulation.
For instance, if you’re creating an epic soundtrack for a medieval movie or game battle scene, use a convolution reverb to simulate cathedral acoustics. However, adding too much distortion or saturation to make the sound more aggressive and intense could clash with the reverberation effect and result in an unpleasant listening experience.
On the other hand, careful balancing between effects can achieve exciting results without sacrificing clarity.
Another tip is to consider how each track sounds. You may need different reverbs for different elements, like drums versus vocals or lead guitar versus background pads.
Experimenting with impulse responses and fine-tuning each track before blending them into one cohesive mixdown can polish off excess dissonance.
Ultimately finding success comes down to trial-and-error experimentation – so don’t be afraid of making mistakes as part of that learning process!
Conclusion
In conclusion, convolution reverb is a game-changer for sound design and audio production. It allows us to recreate the natural acoustics of physical spaces, from cathedrals to arenas, in a once-impossible way.
With its high-quality recordings and frequency-specific reverberation, convolution reverb can take any recording to the next level.
And with so many excellent plugins available today, including free options like Ableton Convolution Reverb and premium options like Altiverb 7 XL, there has never been a better time to start exploring what this powerful tool can do for your music or audio projects.
So why wait? Dive into the world of convolution reverb today and discover how it can transform your recordings into something truly special!
References
https://ask.audio/articles/what-is-convolution-reverb
https://mixdownmag.com.au/features/what-is-convolution-reverb-how-is-it-created-and-used/
https://www.musicianonamission.com/convolution-reverb/
https://www.liquidsonics.com/what-is-convolution-reverb/
https://www.ableton.com/en/packs/convolution-reverb/
https://dvcs.w3.org/hg/audio/raw-file/tip/webaudio/convolution.html