What Is Space Designer Effect in Music Production?
The Space Designer effect is a powerful effect in music production, transforming how you perceive and create sounds. With its ability to recreate virtually any space, this reverb tool has quickly become crucial for producers and engineers alike.
But what sets Space Designer apart from other reverb effects, and how can you use it to your advantage?
When exploring Space Designer, you’ll quickly realize its creative potential.
Whether you’re looking to emulate indoor and outdoor spaces or even the sound of analog gear, Space Designer can do it all.
Key Takeaways
- Space Designer recreates a wide range of spaces for unique reverb effects.
- User-friendly interface with extensive customization options.
- Essential tool for achieving perfect sonic balance in music production.
Space Designer Fundamentals
Overview of Space Designer
Space Designer is a powerful reverb plug-in that comes with Logic Pro X, designed to shape the heard spatial environment of your music production. Using convolution reverb techniques, it adds depth and dimension to your tracks by simulating the sound of various spaces, from small rooms to large halls.
Convolution Reverb
Convolution reverb is a type of digital reverb that uses mathematical calculations to recreate the feeling of a space. It works by capturing and analyzing an impulse response (sampled or synthesized) of a real or virtual space, which is then applied to your audio signal. This reverb technique offers realistic and versatile options to shape your sound, making it popular among music producers and engineers.
Impulse Response
An impulse response (IR) is the key to successful convolution reverb processes in the Space Designer plug-in. It is a snapshot of a space’s reverberant characteristics, which can be captured using a burst of sound, such as a sine wave or loud percussion hit, followed by recording the reflections of that sound within the space. Once you have an IR, it can be loaded into Space Designer to recreate the selected space’s reverb.
Importance of Space Designer in music production:
- Add depth and character to your tracks
- Emulate the sound of various spaces
- Enhance your mix using real-world acoustic environments
Key points:
- Space Designer: a reverb plug-in in Logic Pro X
- Convolution Reverb: digital reverb using impulse response analysis
- Impulse Response: captures the acoustic properties of a space
In conclusion, Space Designer is a valuable tool in music production that uses convolution reverb techniques to give your tracks a spatial environment. Relying on impulse responses from real-world or virtual spaces, it allows you to shape the sound and feel of your mix, ultimately enhancing your creative vision.
Space Designer Interface and Parameters
User Interface Elements
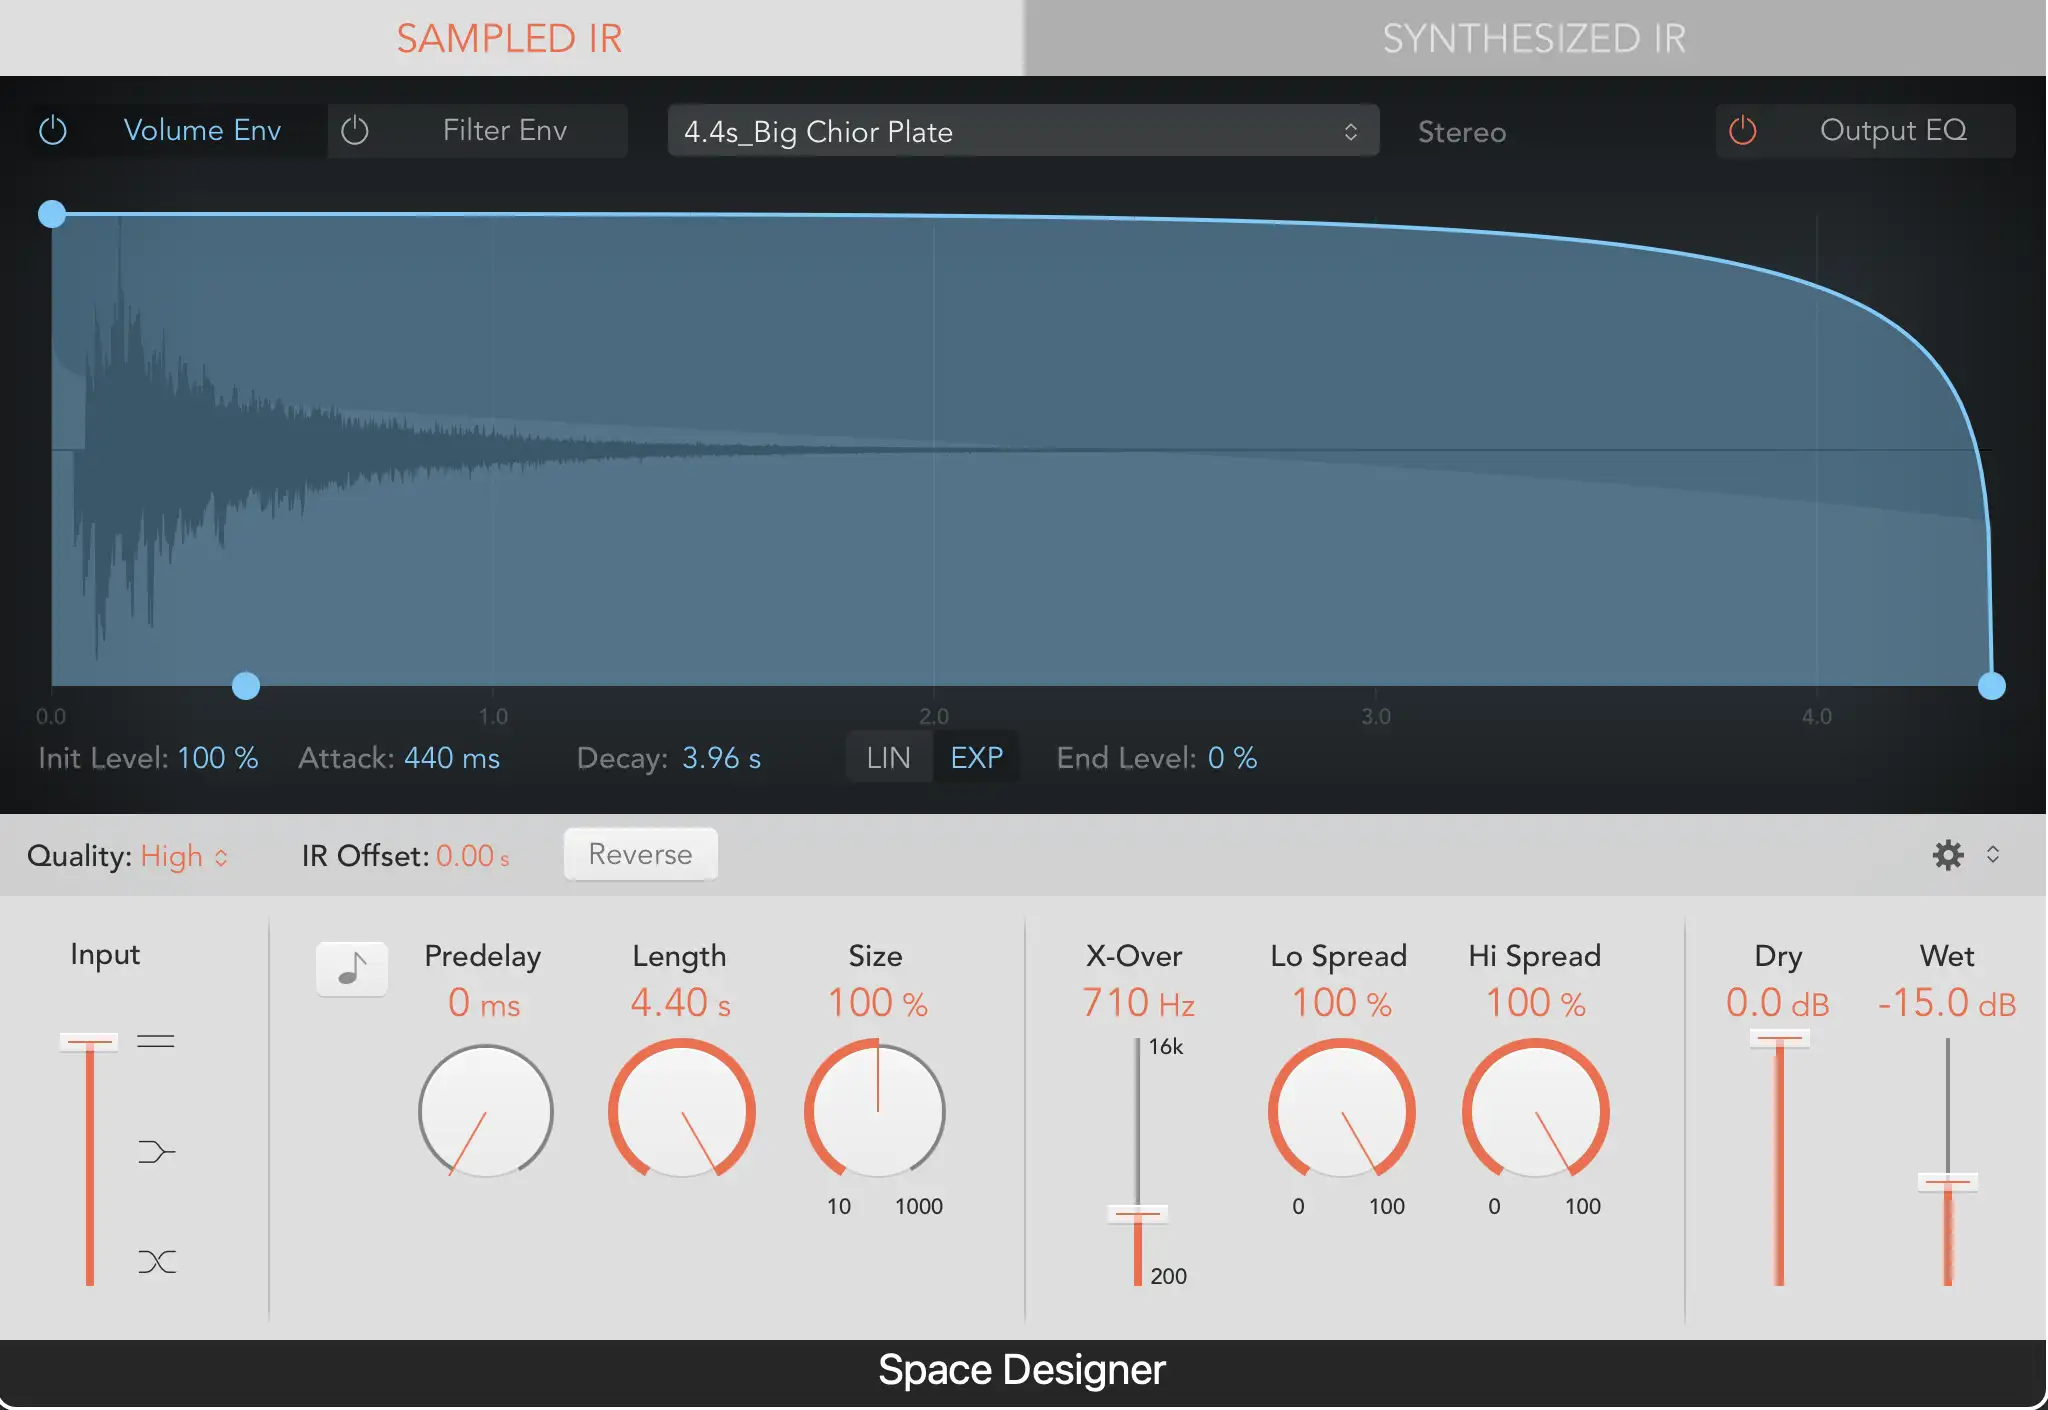
When working with Space Designer in music production, it’s important to familiarize yourself with the user interface elements. The interface features various controls and visualizations, which allow you to tailor the reverb effect to your needs. Elements include the main display, parameter bar, and view buttons for toggling between envelope and EQ views.
Length and Pre-Delay
In the Space Designer, you can adjust the length and pre-delay parameters to control the timing and onset of the reverb effect.
The length determines the reverb’s duration, while pre-delay sets the delay time before the reverb effect begins. Experiment with these settings to find the right balance and create a sense of space and depth in your mix.
Filter and EQ
Space Designer also includes options for filter and EQ manipulation. These controls allow you to shape the frequency response of the reverb effect, boosting or cutting specific frequency ranges. By carefully adjusting the filter and EQ parameters, you can enhance specific elements of your audio or omit unwanted resonances or artifacts.
Volume and Filter Envelope
Another critical aspect of Space Designer is the volume and filter envelope control. By adjusting the volume envelope, you tweak the way the reverb effect fades in and out over time. Likewise, the filter envelope determines how the reverb’s frequency response changes over time. Use these envelopes creatively to create dynamic and interesting soundscapes.
Understanding Space Designer’s interface and parameters is key to effective music production. Here’s a summary of the main parameters:
• Length: Reverb duration
• Pre-Delay: Delay before reverb begins
• Filter: Frequency response shaping
• EQ: Equalization adjustments
• Volume Envelope: Reverb fade in/out control
• Filter Envelope: Dynamic filter changes over time
Play around with these parameters to create a unique and impactful reverb effect tailored to your specific sound. Remember, experimentation is your friend when it comes to unlocking the full potential of Space Designer. Happy producing!
Creating Custom Acoustic Spaces
Synthesized Impulse Responses
With Space Designer, you can create custom acoustic spaces using synthesized impulse responses (IR). By manipulating these IRs, you can shape the sound of your audio, giving it a sense of depth and character. Synthesized IRs offer greater control than recorded IRs and allow you to design unique spaces for your music instead of relying on presets.
For example, if you want your drums to sound like they’re in a small room, you can adjust the synthesized IR settings to create a small acoustic space. This can add a sense of intimacy and presence to your mix.
Understanding Density and Colour
In Space Designer, two important parameters to consider are density and color. Density impacts the complexity of the reverb tail, while color affects the tonal characteristics of the reverb.
- High-density settings result in lush, smooth reverbs that blend well with your audio.
- Low-density settings produce more discrete reflections, creating a sense of spaciousness.
Experimenting with these parameters will help you tailor the reverb to suit your specific needs.
Here’s a table showing how density and color settings impact your reverb:
| Density | Colouration | Result |
|---|---|---|
| High | Bright | Lush, smooth reverb with clear treble |
| High | Dark | Warm, smooth reverb with muted treble |
| Low | Bright | Sparse reflections with clear treble |
| Low | Dark | Delicate reflections with muted treble |
Reverse and Spread Options
Another powerful feature of Space Designer is the ability to reverse the reverb tail. This can create intriguing, other-worldly sounds that add tension and drama to your mix. The reverse option flips the reverb tail, so it starts with the smallest reflections and builds up to the largest.
The spread option controls the stereo image of the reverb. A widespread creates a sense of envelopment, immersing your listener in the space. A narrow spread can help focus your mix and prevent the reverb from overwhelming your audio.
To sum up, here are the main concepts we’ve covered:
- Synthesized IR
- Density
- Color
- Reverse
- Spread
By understanding and experimenting with these parameters, you can effectively use Space Designer to create the perfect acoustic space for your music.
Using Space Designer Effect in a Mix
Choosing and Customizing Presets
To begin incorporating Space Designer in your mix, start by selecting the appropriate presets. Logic’s Space Designer offers a variety of presets to choose from, which can be customized according to your needs. When exploring presets, try out various options to find the one that best complements your track and enhances its ambiance.
Remember, you can always tweak the settings within the preset to achieve the perfect balance for your mix 1.
Once you’ve found the right preset, you can further customize it using the envelope and other parameters. Space Designer provides a dedicated envelope section, allowing you to control the decay and duration of the reverb signal 2.
Experimenting with the envelope settings is key to achieving the desired reverb effect.
Stereo Imaging and Speaker Placement
In music production, stereo imaging plays a significant role in providing depth and dimension to your mix. Space Designer is capable of emulating various stereo configurations, which can be selected within the plugin’s interface.
To optimize stereo imaging, consider the following aspects:
- Width: Wider settings create a more spacious sound, while narrower settings generate a focused, centralized sound.
- Speaker placement: Positioned speakers close together can increase the sense of space, while speakers placed farther apart can create more separation between your mix elements.
By carefully balancing these factors, you can use Space Designer to enhance your mix’s overall stereo imaging and speaker placement.
Reverb Types in Space Designer
While using Space Designer, you might come across different types of reverb effects. Here is a brief list of some common reverb types:
- Hall: Suited for orchestral or large, open spaces
- Room: Best for smaller spaces or when a more intimate feeling is desired
- Plate: Offers a dense, even reverb with a smooth tail
- Spring: Gives an old-school, vintage vibe, commonly used with guitar or vocal tracks
Being familiar with these reverb types can help you make better decisions when choosing and customizing presets in Space Designer.
To sum up, utilizing Space Designer in your mix requires selecting the right presets, customizing them using envelopes and other parameters, and optimizing stereo imaging and speaker placement. By mastering these aspects, you can significantly enhance the overall ambiance and depth of your music production.
Footnotes
-
How to Use Space Designer in Logic ↩
Advanced Techniques and Tips
Creating and Using Custom Impulse Responses
One of the most powerful aspects of Space Designer is its ability to use custom impulse responses (IRs), which can dramatically expand your sonic possibilities. When working with convolution reverbs like Space Designer, impulse responses capture the unique reverb characteristics of any physical or digital space.
Creating your own IRs can be as simple as recording the sound of a clap in a room or more complex using specialized software. To create a custom IR, follow these steps:
- Record the sound of an empty room, cabinets, or unique space.
- Edit and normalize the audio file.
- Import the audio file into Space Designer.
Using custom IRs in your music production helps you achieve unique spatial effects that set your music apart. Furthermore, you can experiment with unconventional IR sources, like guitar cabinets, for an edgier sound.
Harnessing High-Pass and Low-Pass Filters
A vital tool in Space Designer is the use of high-pass (HP) and low-pass filters, which have a significant impact on the character of your reverb. By employing filters, you can easily control the frequency content of the reverb, either by cutting the low-end rumble or smoothing out the high-end shimmer.
- High-Pass Filter: It allows only frequencies above a specific threshold, called the HP point, to pass through. Use a high-pass filter to get rid of unwanted low-frequency content and avoid muddiness in your mix.
- Low-Pass Filter: It does the opposite by allowing only frequencies below a specific threshold, called the LP point, to pass through. A low-pass filter helps tame harshness in the reverb tail.
Explore combining HP and LP filters to create a tailored space for your reverb, allowing you to effortlessly blend it with the rest of your mix.
By mastering advanced techniques like custom impulse responses and filters in Space Designer, you’re unlocking the full potential of its convolution reverb capabilities. For those looking to dive deeper into music production, you can consider checking out music production diploma courses at institutions like Point Blank.
List of steps to create custom IRs:
- Record the sound.
- Edit and normalize.
- Import into Space Designer.
Here is a table to summarize the use of high-pass and low-pass filters in Space Designer:
| Filter Type | Function | Benefit |
|---|---|---|
| High-Pass | Allows frequencies above HP point | Reduces muddiness |
| Low-Pass | Allows frequencies below LP point | Reduces harshness |
Conclusion
To wrap things up, the Space Designer effect is a versatile tool in music production, allowing you to create diverse reflections and textures in your soundscape. This powerful effect brings your tracks to life, from convolution reverb to simulating different spaces.
Let’s highlight its key features:
- Convolution reverb engine
- Recreates various spaces and environments
- Experimentation potential for unique effects
Remember, even though it might feel overwhelming, you’ve got this! Imagine the sense of accomplishment you’ll feel as your music comes alive with depth and character. Instead of feeling stuck, you’ll soon be mastering the techniques with a renewed sense of purpose.
So, dive in and explore the world of sound design using Space Designer. Challenge yourself to push the boundaries and discover new ways to elevate your productions. Before you know it, you’ll wonder how you ever managed without it!